Sparkfun heart rate monitor

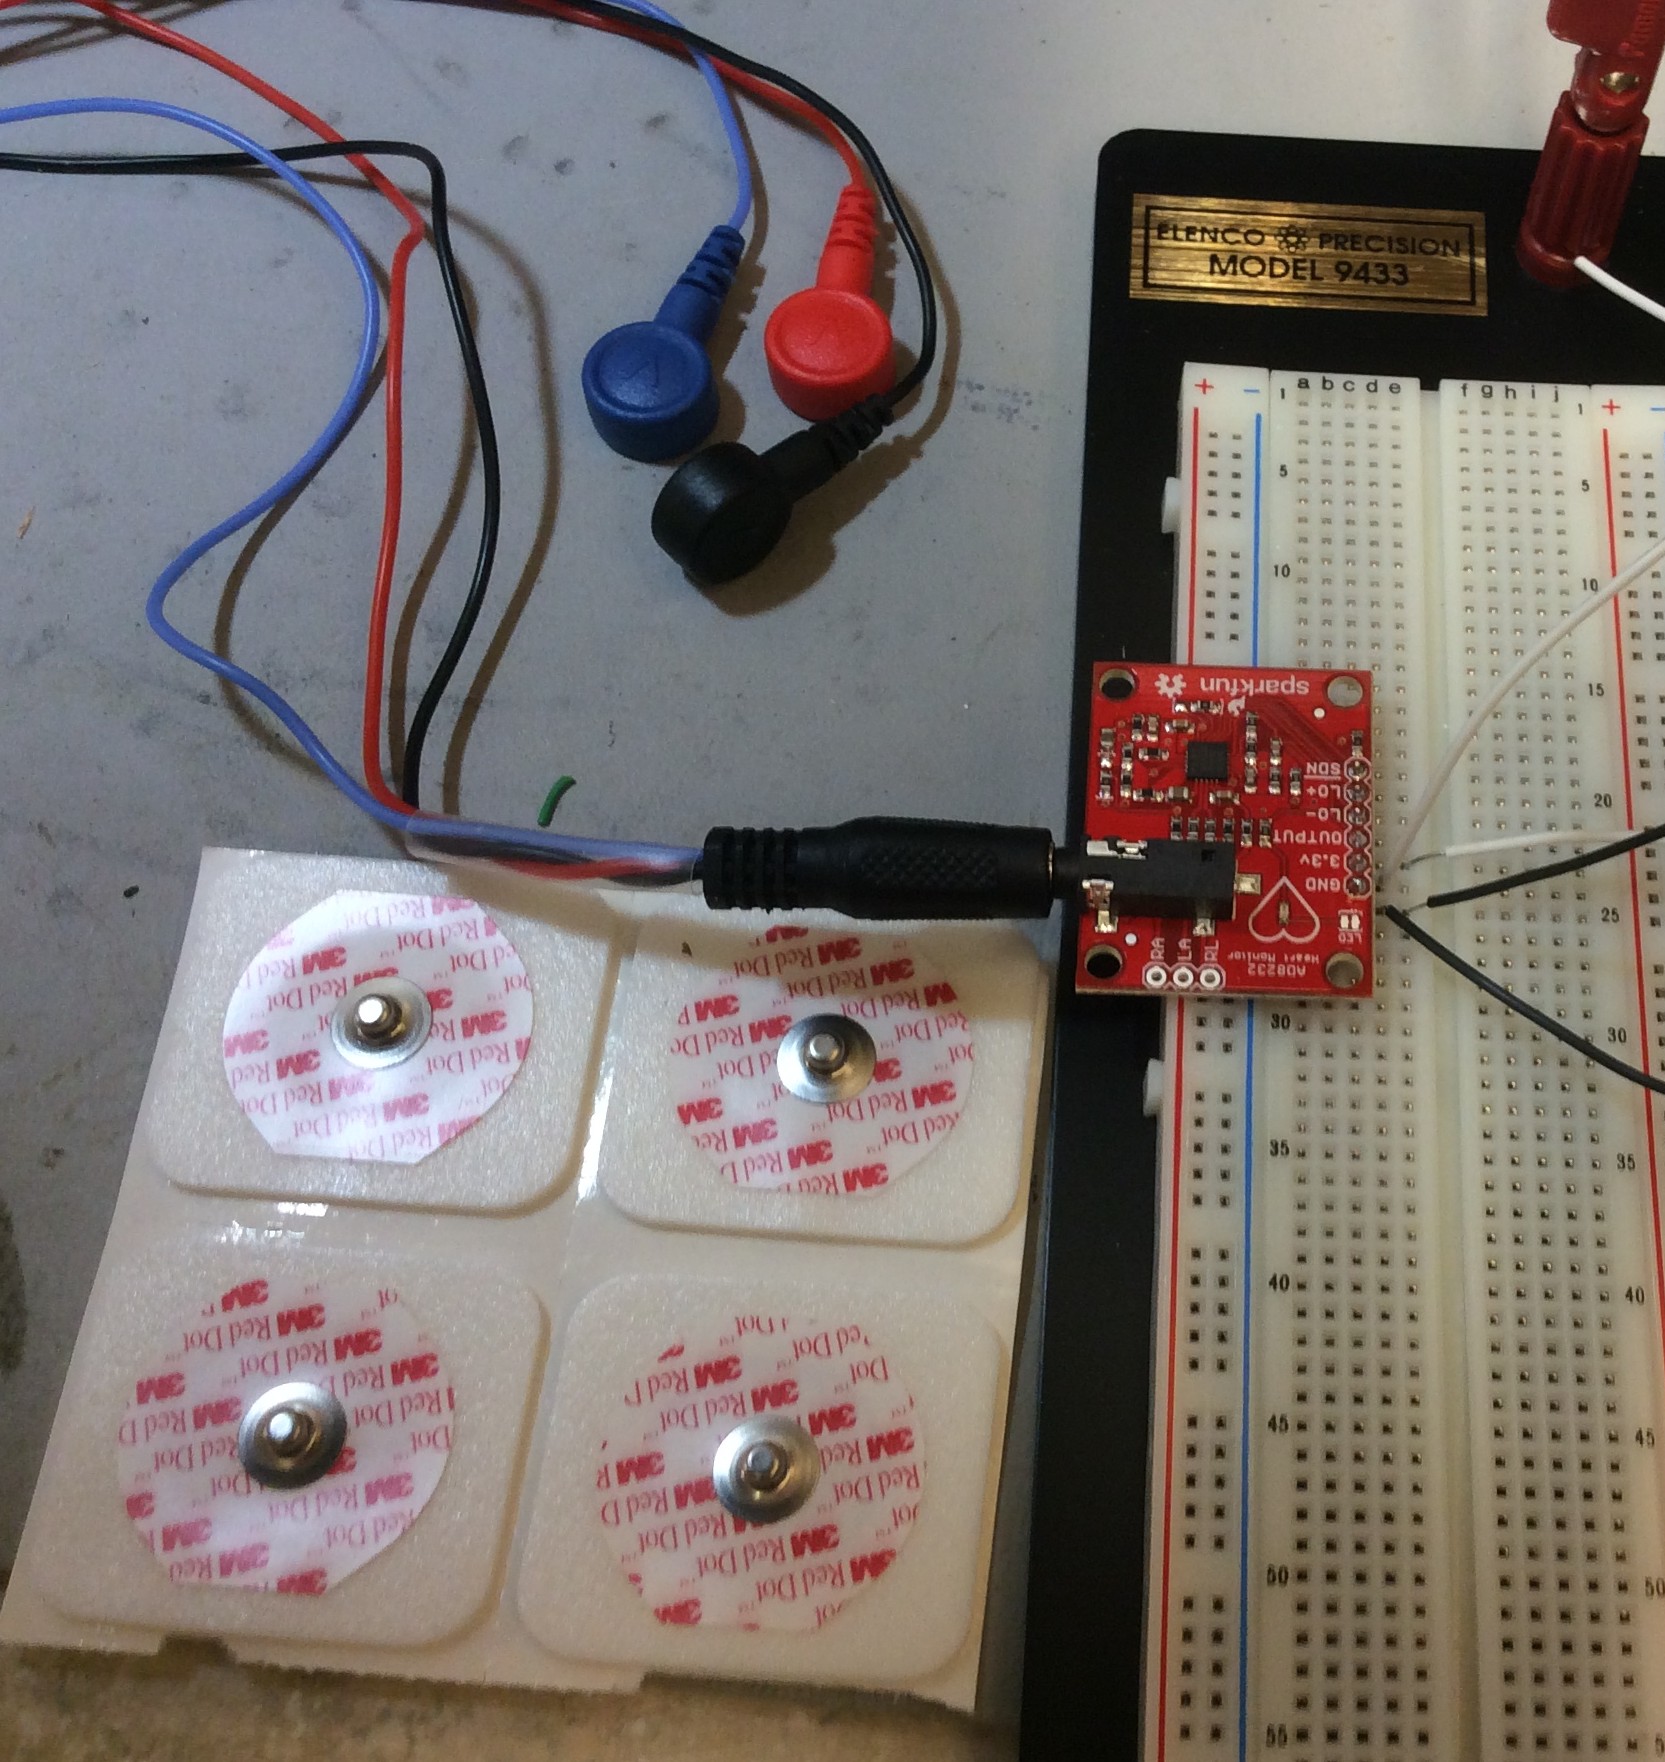
Pulled Sparkfun’s breakout for the AD8232 single lead heart rate processor from the box and started playing with it. Spent the evening in the hobby room (as the 9yo calls it) with the 9 year old. He wanted it hooked up to himself. What can a father do but say yes, let’s hookup bio-medical devices to you!

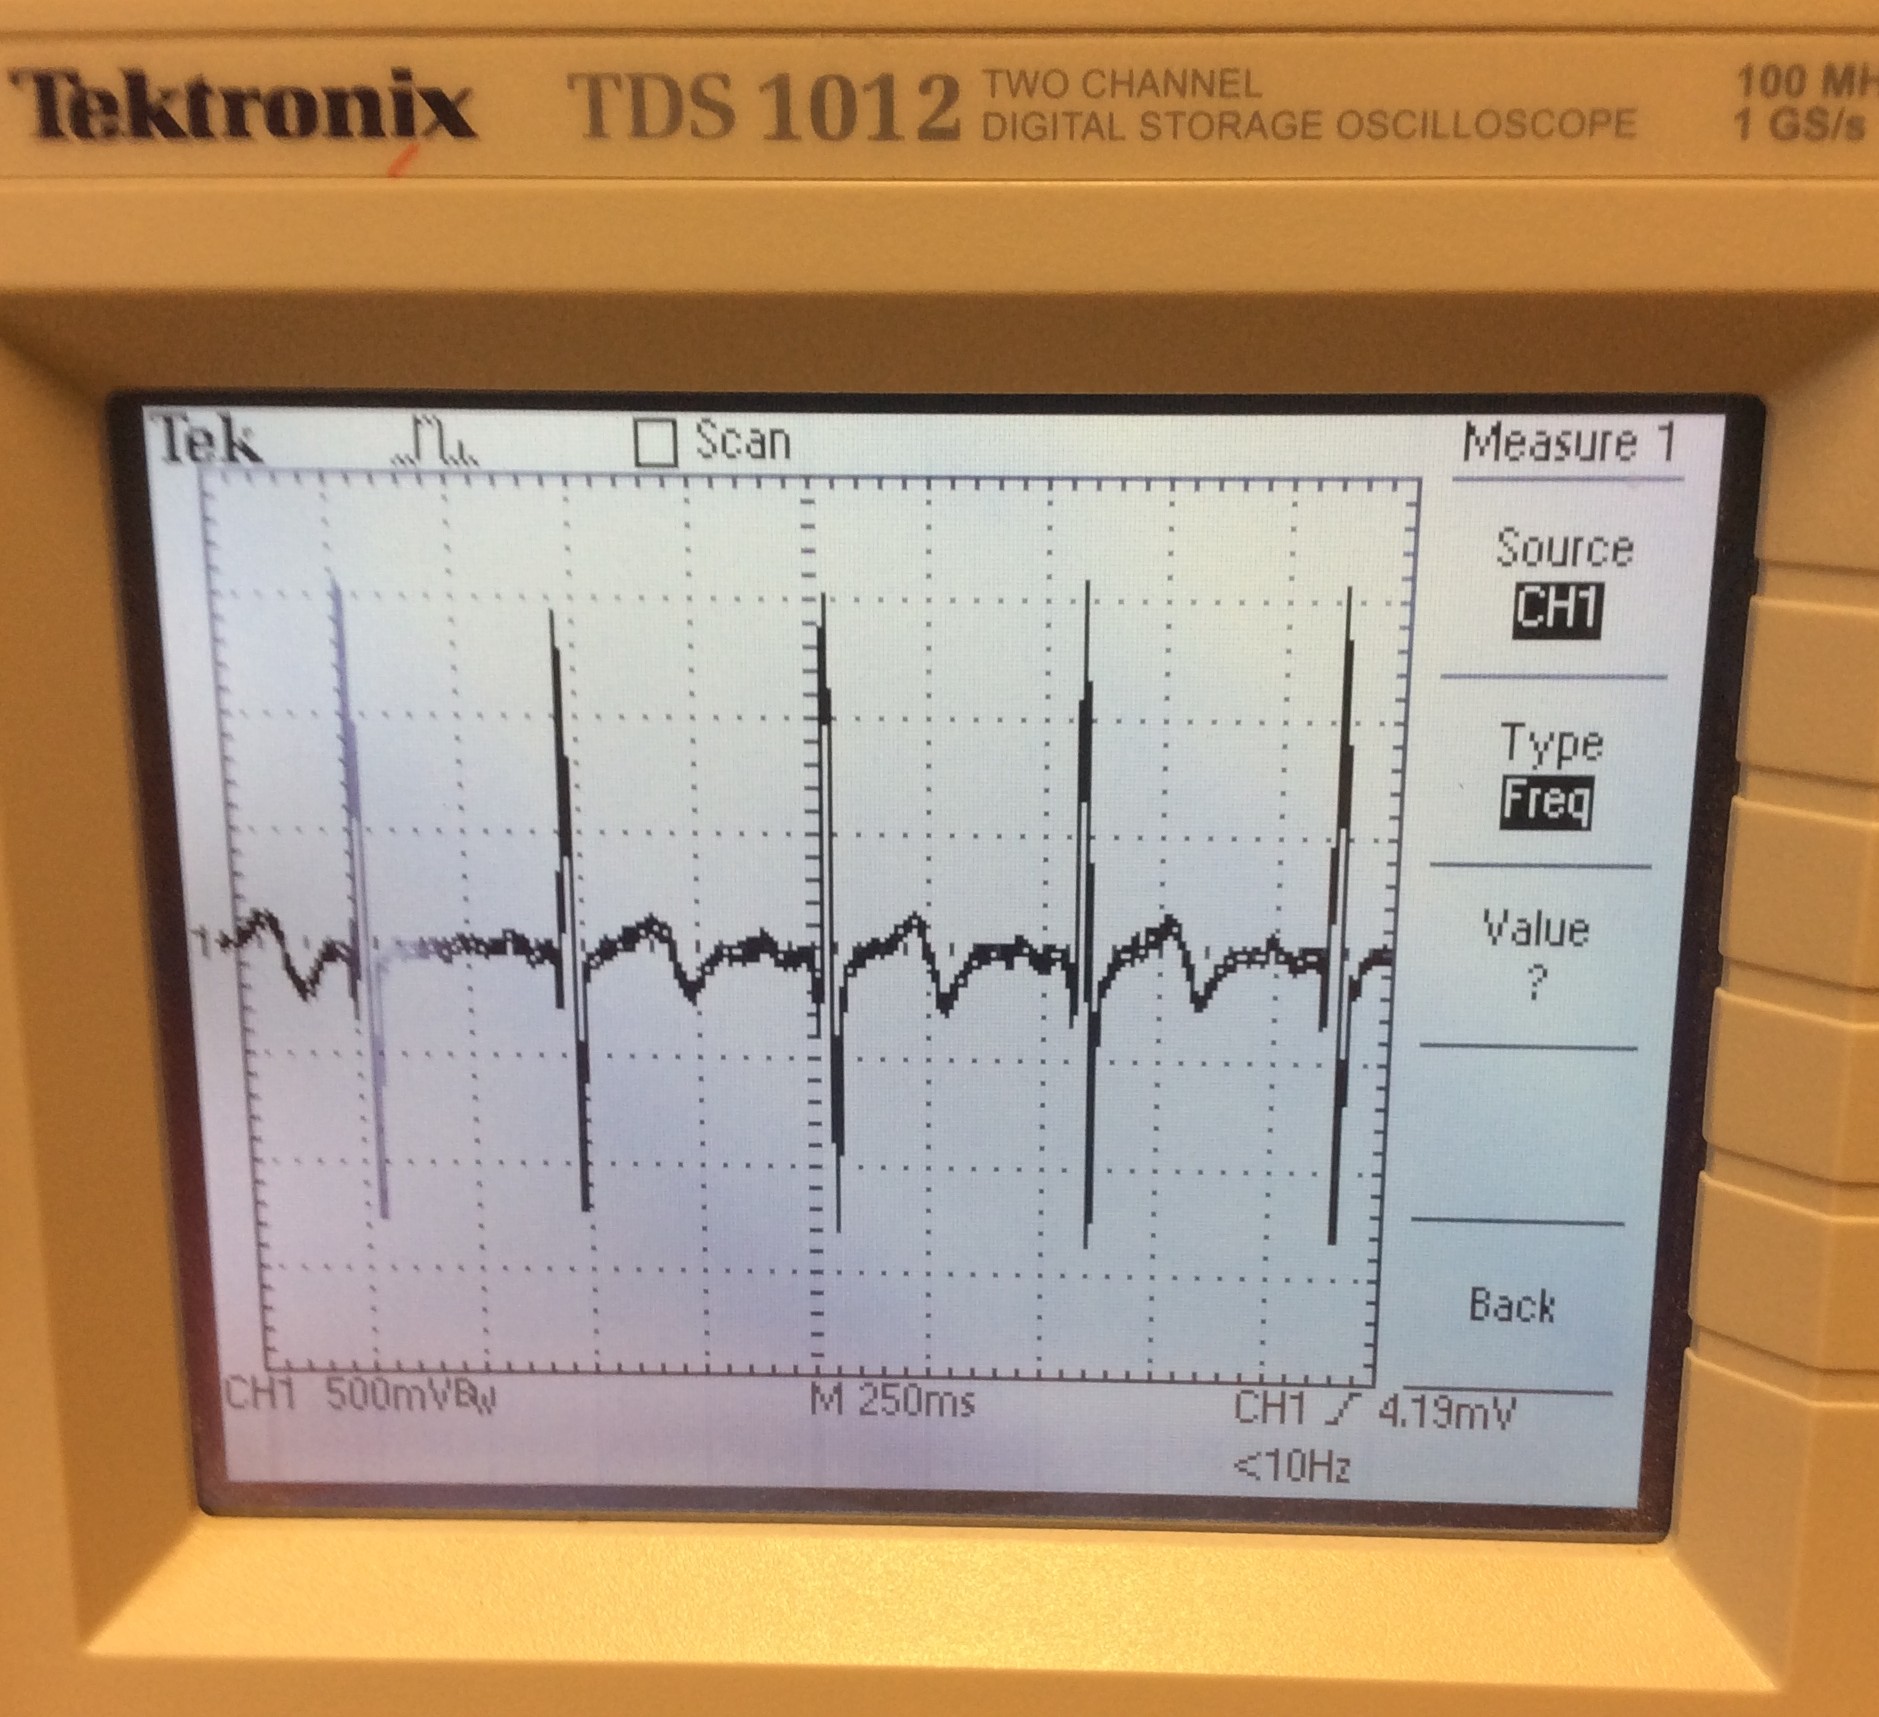
You can use the foam electrode pads up really quickly. You can find them much cheaper on Amazon. I bought a bag of 50 for $13 of the 3m red dot foam electrodes To make the exercise short, I put headers on the breakout boards and hooked it up to the oscilloscope. Set the oscilloscope to 250ms per division. The AD8232 generates output signals that have a peak of almost two volts.

One of the problems we encountered early on is where to put the electrodes. Not being from the medical establishment a quick google search yield that the ground (black) electrode goes on the right side about the last rib. The plus (red) goes on the right of the torso just below the collar bone, and the negative electrode goes just below the breast area on the left side. Freescale has a heart rate monitor project that contains great explanations and diagrams. Find the PDF here: Freescale: How to Create a Heart Rate Monitor and One-Lead EKG

IMG_0282

IMG_0284

Maker space construction part 2

Laid in the sub floor using 3/4″ plywood. I installed some cross bracing to help eliminate any squeaks. Put half inch drywall on the walls, mudded, primed, and painted. I skipped the texture process due to cost. The spray cans are great, but just not cost effective. Renting a texture spray gun would cost at least $80.

I picked a 12-13% gray for the walls from Miller Paint. I’m generally very disappointed with Miller Paint. In the last two years I’ve used at least ten gallons of Miller brand paint. Several gallons at The Cabin and at least six in the new house. I’ve had a lot of chipping, general durability problems, and poor coverage. I believe I’ve used all the correct techniques including using fresh paint, mixing, and priming.

For the gray color, I went into a local Miller paint store with a photo color calibration card. They could not take CYMK, LAB, or Pantone values. They matched the color by eye from a catalog.

IMG_0242

IMG_0244

IMG_0245

Building a new makerspace

I’m building a new ham “shack” / maker space (for my electronics workbench) in the garage. It is a 80 sq foot space that will be framed, insulated, but easily removable should I decided to move. There is no plumbing or wiring, to avoid code issues.

IMG_0234

IMG_0235

IMG_0236

AMD 5350 APU in a Cooler Master HAF XB EVO case

I recently put together a very affordable system to run crashplan and perform secondary NAS duties. I chose an AMD 5350 system on chip (SoC). I have used many Intel Atom boxes, and they chips are great, but always found the motherboards lacking in I/O. The 5350 APU series is socketed; you can choose your own motherboard. I paired it with a ASUS AM1M-A motherboards. This was one of the few motherboards I could find that had two extra PCI-Express 1x slots. The motherboard has two on-board SATA3 connectors. I installed on IO Crest SATA 4 Port SATA controller to provide four more ports. the trick to this configuration is that the PCIe 1x slots can not provide more than ~500mb/s of bandwidth. A SATA controller will quickly become saturated using more than SSD. The bandwidth is more than enough for multiple mechanical disks.

I also chose a Cooler Master HAF XB EVO case. This has four internal 3.5″ bays and four external 3.5″ bays. I’m using brackets to pack two SSD’s per 3.5″ bay.

All the hardware listed here works flawlessly with Ubuntu server. No extra drivers required.

Samba transfer rates are about 130mb/s with the SSD and 110mb/s with the mechanical disk. 130mb/s is not real as this exceeds one gigabport ethernet port speed. Crashplan transfers about 25mbit/s.

_DSC0973

_DSC0974

_DSC0975

6m opening from the Cabin

The night before we had to leave the cabin there was a nice 6m opening to DM04, DM13, and DM14. I configured my Buddipole with a two element yagi and ran about 50 watts from the Elecraft K3. Received signal reports from 54 to 59 from those grids. Worked about a dozen stations and even received a nice QSL card from K6JAD.

buddipole 6m yagi