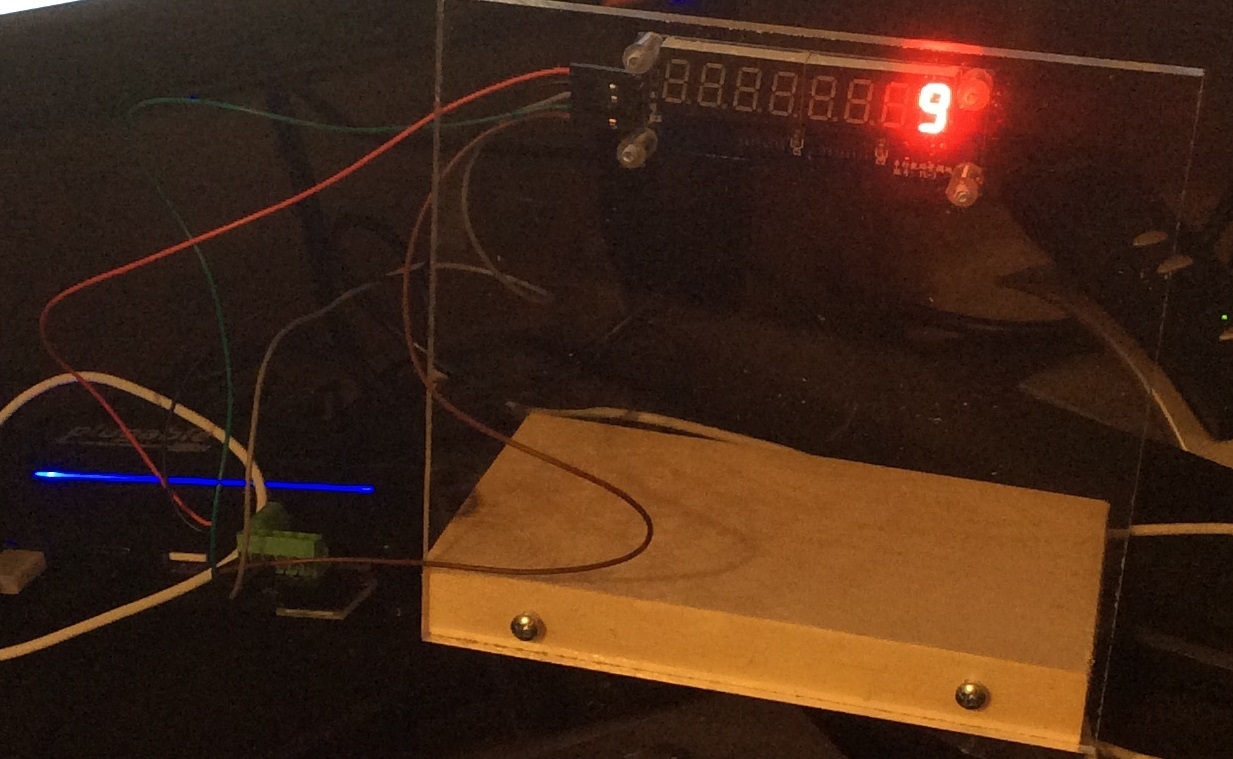
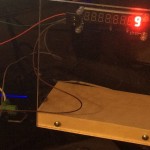
I decided to build a display for my desk at work that shows my current bug count using the 7 digit segment display that I purchased from DealExtreme. I do not want an Arduino hanging off a USB cable cluttering my desk (or draining my wallet). Enter the Digispark. Designed and produced by a local Portland company, the Digispark is an ATtiny85 that fits directly into a USB port.
On the computer side, A python program runs on my desktop. It queries Trac every once in a while and if the bug count changes, sends a message to the display.
Code for the Digispark:
#include <DigiUSB.h>

#define latch 0
#define clock 1
#define data 2
#define kDigitCount 8

char gDisplayBuffer[kDigitCount+1];

void setup()
{
   pinMode(latch, OUTPUT);
   pinMode(clock, OUTPUT);
   pinMode(data, OUTPUT);

   memset(gDisplayBuffer, ' ', kDigitCount);
   writeToDisplay(true);

   DigiUSB.begin(); // open DigiUSB
}


void writeDigit(int digit, char inValue)
{
  byte value = 0;
  byte bitsToSend = 0;

  bitSet(bitsToSend, digit);

  digitalWrite(latch,LOW);
  shiftOut(data,clock,MSBFIRST, bitsToSend);


    switch (inValue)
    {
        case '.': value = B01111111; break;
        case '1': value = B11111001; break;
        case '2': value = B10100100; break;
        case '3': value = B10110000; break;
        case '4': value = B10011001; break;
        case '5': value = B10010010; break;
        case '6': value = B10000011; break;
        case '7': value = B11111000; break;
        case '8': value = B10000000; break;
        case '9': value = B10010000; break;
        case '0': value = B11000000; break;
        case 'H': value = B10001001; break;
        case 'i': value = B11111011; break;

        default:
        case ' ': value = B11111111; break;
    }

    shiftOut(data,clock,MSBFIRST,value);

  digitalWrite(latch,HIGH);
}

void writeToDisplay(bool inOveride)
{
  for (int i = 0 ; i < kDigitCount ; i++)
  {
    if (' ' != gDisplayBuffer[i] || inOveride)
      writeDigit(i, gDisplayBuffer[i]);
  }
}


int readBytesUntil(char delim, char* outBuffer, int inMaxSize)
{
  int bytesRead = 0;
  int lastRead = 0;

  while ( bytesRead < inMaxSize )
  {
    if (DigiUSB.available())
    {
      lastRead = DigiUSB.read();

      if ('\n' == lastRead)
        break;

      outBuffer[bytesRead] = lastRead;
      ++bytesRead;
    }

    // refresh the usb port for 10 milliseconds
    DigiUSB.delay(10);
  }

  outBuffer[bytesRead] = 0;

  return bytesRead;
}


void loop()
{
  char cmdBuffer[16];

    if (DigiUSB.available())
    {
      memset(cmdBuffer, ' ', 16);
      int iBytes = readBytesUntil('\n', cmdBuffer, 12);
      cmdBuffer[iBytes] = 0;

      if (!strncmp(cmdBuffer, "SET ", 4))
      {
        if (12 != strlen(cmdBuffer))
          DigiUSB.println("ERR");
        else
          memcpy(gDisplayBuffer, &cmdBuffer[4], kDigitCount);
      }
      else if (!strncmp(cmdBuffer, "CLR", 3))
      {
          memcpy(gDisplayBuffer, "        ", kDigitCount);

          writeToDisplay(true);
      }
    }

  writeToDisplay(false);
  DigiUSB.refresh();
}
The Python code:
'''
The Windows (or desktop) software that periodically gets the bug
count from TRAC and sends it to the 8 digit display.
'''

import urllib
import time

from arduino.usbdevice import ArduinoUsbDevice

kTracUrl = "http://trac/report?asc=1&format=csv"


################################################################################
class TracAggregation:
   def __init__(self):
      self.m_BugTickets = 0

   def incrementBugs(self):
      self.m_BugTickets += 1

   def totalBugs(self):
      return self.m_BugTickets

   def __str__(self):
      return str(self.m_BugTickets)


################################################################################
class TracEntry:
   def __init__(self):
      self.m_Ticket    = None
      self.m_Summary   = None
      self.m_Type      = None
      self.m_Priority  = None
      self.m_Milestone = None


################################################################################
def parseLine(inLine):
   tokens = inLine.split(',')

   oEntry             = TracEntry()

   # change for your customized Trac query here
   oEntry.m_Ticket    = tokens[0]
   oEntry.m_Summary   = tokens[1]
   oEntry.m_Type      = tokens[4]
   oEntry.m_Priority  = tokens[5]
   oEntry.m_Milestone = tokens[6]

   return oEntry


################################################################################
def parseTracData(inData):

   entryList = []
   lineList  = inData.splitlines()

   for line in lineList[1:]: # skip the header

      try:
         oEntry = parseLine(line)
         entryList.append(oEntry)
      except:
         pass

   return entryList


################################################################################
def aggregateTracData(parsedData, bExcludeBacklog=True):

   oData = TracAggregation()

   for oEntry in parsedData:
      if "Bug" == oEntry.m_Type:
         if bExcludeBacklog and "Backlog" != oEntry.m_Milestone:
            oData.incrementBugs()
         elif not bExcludeBacklog:
            oData.incrementBugs()

   return oData


################################################################################
def getTracData(url=kTracUrl):
   try:
      tracConnection = urllib.urlopen(url)
      tracData       = tracConnection.read()
      tracConnection.close()
   except Exception as e:
      print(e)
      return (False, None)

   parsedData     = parseTracData(tracData)
   aggregatedData = aggregateTracData(parsedData)

   return (True, aggregatedData)


################################################################################
def sendToDisplay(inMessage):

   try:
      theDevice = ArduinoUsbDevice(idVendor=0x16c0, idProduct=0x05df)
   except:
      return False

   for c in "SET ":
      theDevice.write(ord(c))

   for c in inMessage:
      theDevice.write(ord(c))

   return True


################################################################################
if __name__ == "__main__":

   lastTotalBugs = 0

   while (True):
      (ok, tracData) = getTracData()

      if ok and lastTotalBugs != tracData.totalBugs():
         displayMessage = str(tracData.totalBugs()).rjust(8, ' ')
         lastTotalBugs  = tracData.totalBugs()

         # only send the new bug count if it changed
         sendToDisplay(displayMessage)

      time.sleep(60)