Washing clothes off grid

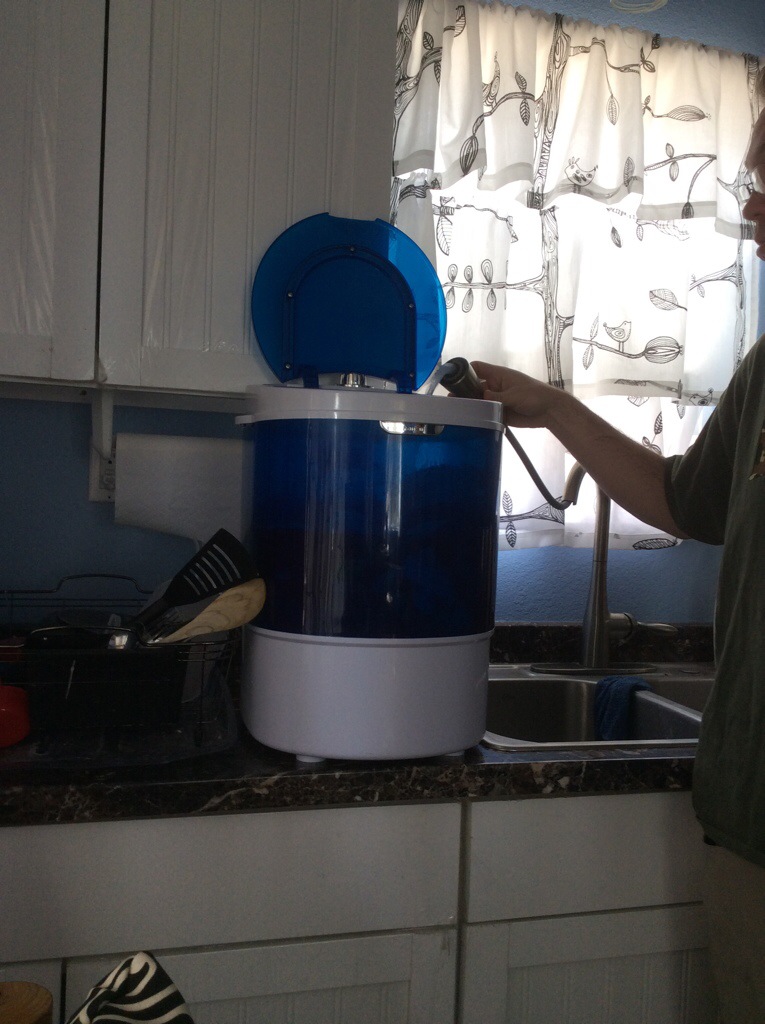
Today the kids got dirty. They love playing in the dust, dirt, and digging holes. We dug out the base camp counter top clothes washer. This is the first time we’ve used this. Filled it with hot water, dirty kids clothes, high efficiency detergent and let it run.

This thing is noisy! The mechanical timer by itself is noisy. The agitator is noisy. Our kids clothing was so dirty, I gave up after rinsing three times. This makes me wonder how much water we use at home washing kids clothing.

20140525-111840-40720254.jpg

Expanding the battery bank

We are expanding the battery bank to three strings of batteries. The primary reason for doing this is to decrease the cycle depth. The bank typically drops to 12.6v each night. My goal is to get this closer to 12.7v to 12.75v. Two more DC335-6 batteries will bring the capacity to ~1000ah at 20C discharge rate. A 20C discharge rate is 50amps per hour for 20 hours. I figure on average our consumption is 10 to 15 amps per hour.

20140525-112737-41257605.jpg

Bare bones assembly instructions for LM380 audio amp

There is a minimal number of parts necessary to enable the audio amp on this PCB.

  1. Install U2, the LM380
  2. Install electrolytic capacitor C3. I used a 100uF here. You can use a bigger/smaller value if you want (changes) the frequency response.
  3. Install resistor R1. This can be anywhere between 2.2 and 30 ohms. This resistor should be rated for at least a half watt.
  4. Install filtering capacitors C1 and C2.
  5. If you want on board volume control, install potentiometer R15. The footprint is for a Bourns PTV09A-4020F-A103 available at Mouser for $0.70. If you use R15, then jumper pins 1 and 3 of J3.
  6. You can use an external potentiometer by using header J3 and pins 1 (GND), 3 (U2 input), and 4 (SIG). Feed the audio input into pin 3 of J1.
  7. The board has four mounting holes for 4-40 screws. There should be enough space to use R15 and mount the hold board against a panel if the headers are solder on the back of the board.

LM380 pcb

There is a trick to the Aeropress

Robert introduced me to Aeorobie’s Aeropress coffee maker. For $26 it is a great deal. I use it almost daily (and maybe sometimes twice).

It produces a strong espresso-like coffee. Heather likes it with Lavazza Super Crema Espresso. She mixes it soy and a flavoring. Personally, I use it to make Americano style coffee.

The Aeropress is simple to operate. My formula is to grind very fine coffee, add nearly boiling water, don’t stir. Wait twenty seconds, then press the plunger. The trick is that depending on the type of coffee you are making, you want to stir or not stir. I find not stirring provides less acidic and slightly more flavorful tasting coffee.

LM380 pcb arrived

Within two weeks of placing my order with Seeed Studio, the boards arrived. They were shipped from a California address. If they are now manufacturing locally, then very cool. Mostly because it’s still cheap. Ten boards cost me $18 shipped. Friends may ask for one 🙂

LM380 pcb

20m RF Amp, Ugly Style

Today’s Saturday project was to solder up ugly style a 20m RF amplifier that resided on my bench for like six months. It’s been nearly a decade since I did anything ugly or Manhattan style. This project was actually an excuse to design a RF low pass filter and test it with my Rigol spectrum analyzer. The screen shots below show that the first harmonic is suppressed by 26db. Mysteriously, there is a harmonic below the primary frequency. I used a 2N3866 power transistor. This are getting hard to find, but I’ve managed to get a supply from Aliexpress.

_KD7QJL 20m RF AMP

1

2

Edit 2014-12-25:

I used the low pass filter to test the miniVNA Pro. Here is what the loss response looks like:

20m ugly amp loss response

LA Police Gear: Disappointing surprise bag

Once or so a year LAPG has a grab bag. They price this at $9.99 and you get at least that amount of value, but usually more. I bought two. I paid for the suspense and surprise, but did not get anything of value. If you look at the real value of off-brand AA’s, then I probably got shorted.

_DSC0301 copy

Modular LM380 Audio Amplifier Board

Edit: PCB’s have arrived.

The first draft of a modular LM380 “building block” is finished. The schematic and board layout are available on Upverter. The board fits within the 5cm by 5cm size that corresponds to Seeed Studio’s $9.99 fabrication service.

I designed this board with several features in mind:

  1. Modular design, can be used for prototypes (needs screw holes) or breadboard
  2. Runs at multiple voltage ranges
  3. Provide a front-end opamp for modular filtering. Be able to turn bypass the filtering via jumpers.
  4. Provide on-board space for a potentiometer (Bourns PTV09A-4020F-A103) that faces up for panel mounting.
  5. There is a 0.1″ headers for using an external potentiometer.
  6. Provide 0.1″ pins on one edge of the board so that the board can be plugged into a breadboard.

New Gear: Sigma DP1 Camera

Ever since I read about the Foveon sensor, I’ve wanted to own one. I have strange attraction to weird and off kilter gear (really of any kind). Finally won an auction for one on ebay (an original Sigma DP1). There is are more modern versions like the DP1 Merrill.

Sigma DP1

A few observations:

  • This thing is slow!
  • It will not focus up close; needs like 12 to 20 inches
  • The controls are not intuitive, but surprisingly not hard to use
  • The output looks noisier than I expected as ISO400

I like how the pictures look in black and white. Here is an example picture shot in RAW and processed in Perfect B&W.

PacTrust pond

SDIM0013