Starting the Epiphyte 2 Build

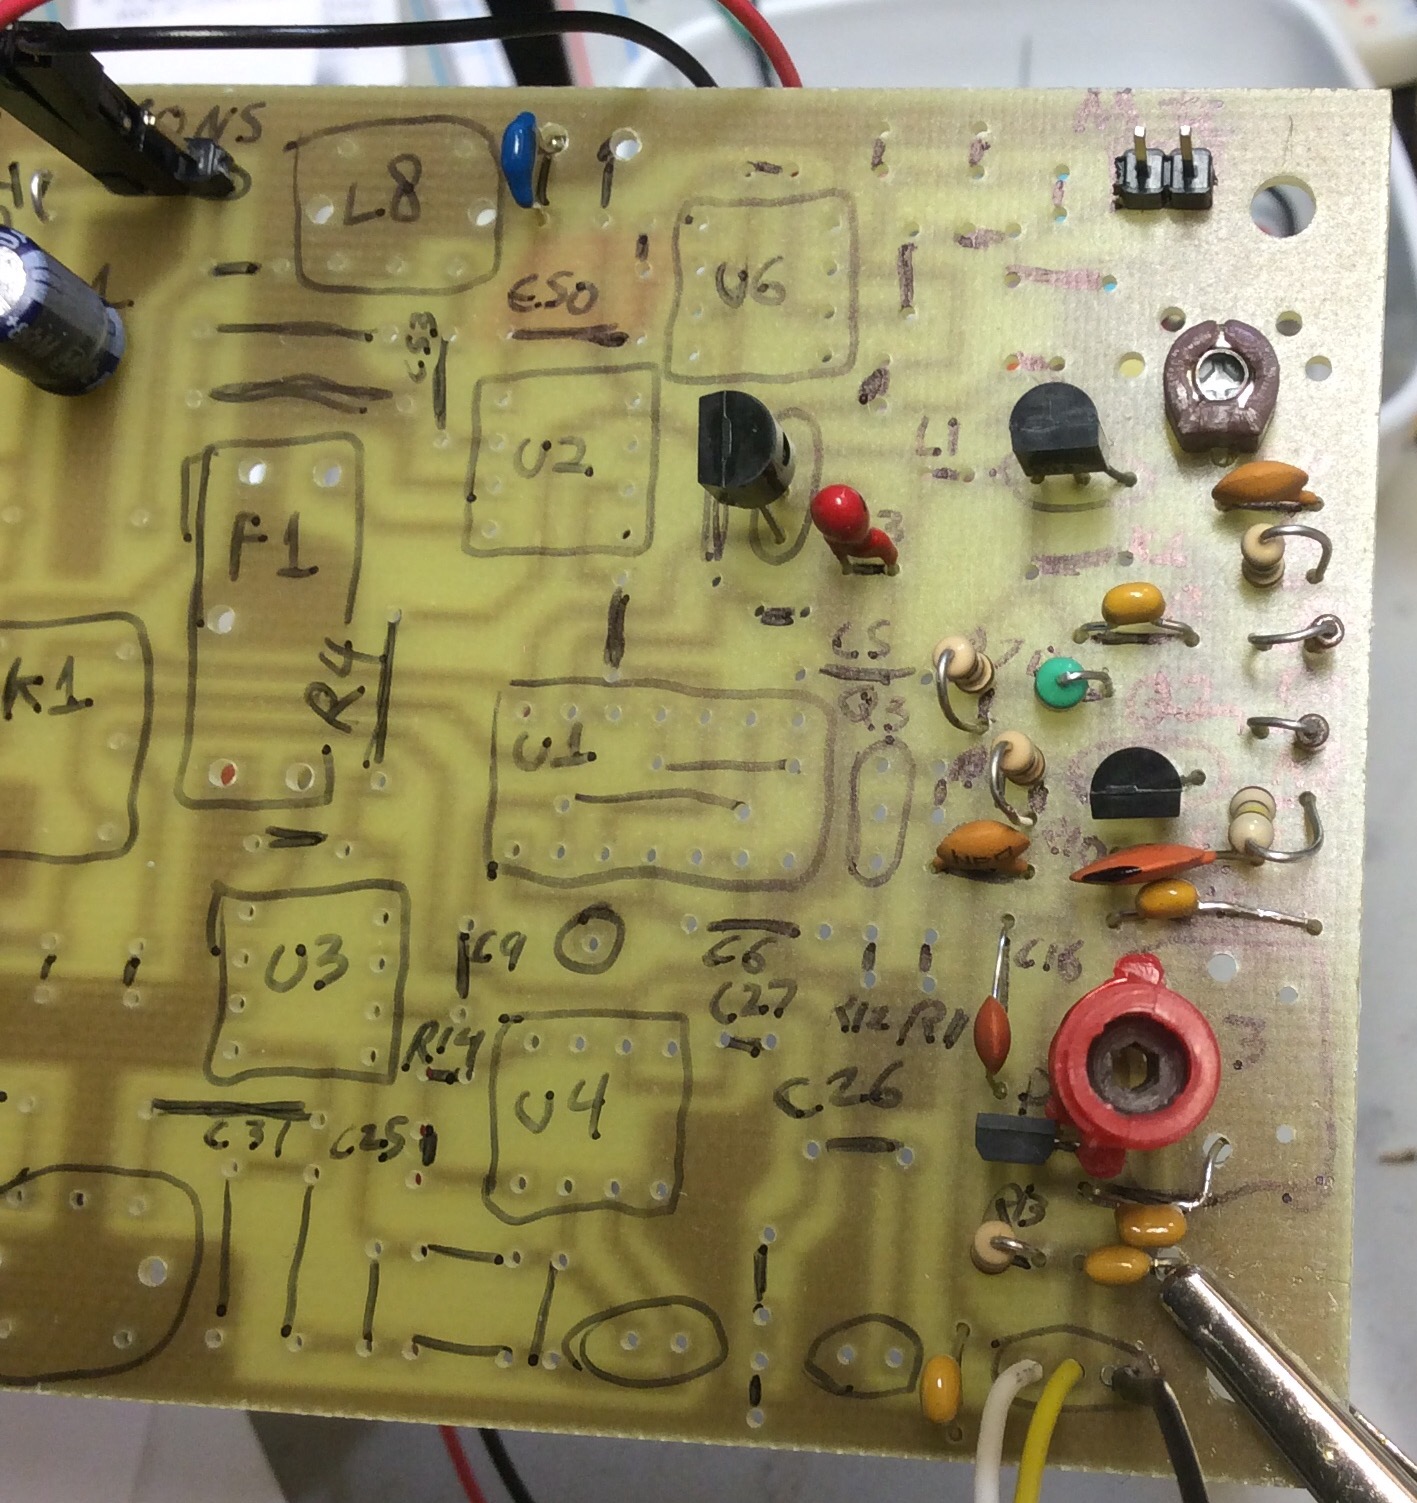
I’ve been thinking of buying a KD1JV 75m “Survivor” ssb radio kit. I came across the precursor to the Survivor, the Epiphyte. Derry Spittle VE7QK, now a SK originally designed the Epiphyte in the early 1990’s. The Epiphyte uses several now obsolete parts to reduce total parts count. Most notably a CA3020A and a Murata M455J1 ssb bandwidth filter. I’ve sourced the CA3020A cheaply from China. The M455J1 is harder to find. Occasionally, you see some on ebay for about USD$60. I purchased a PCB from Far Electronics for USD$10.

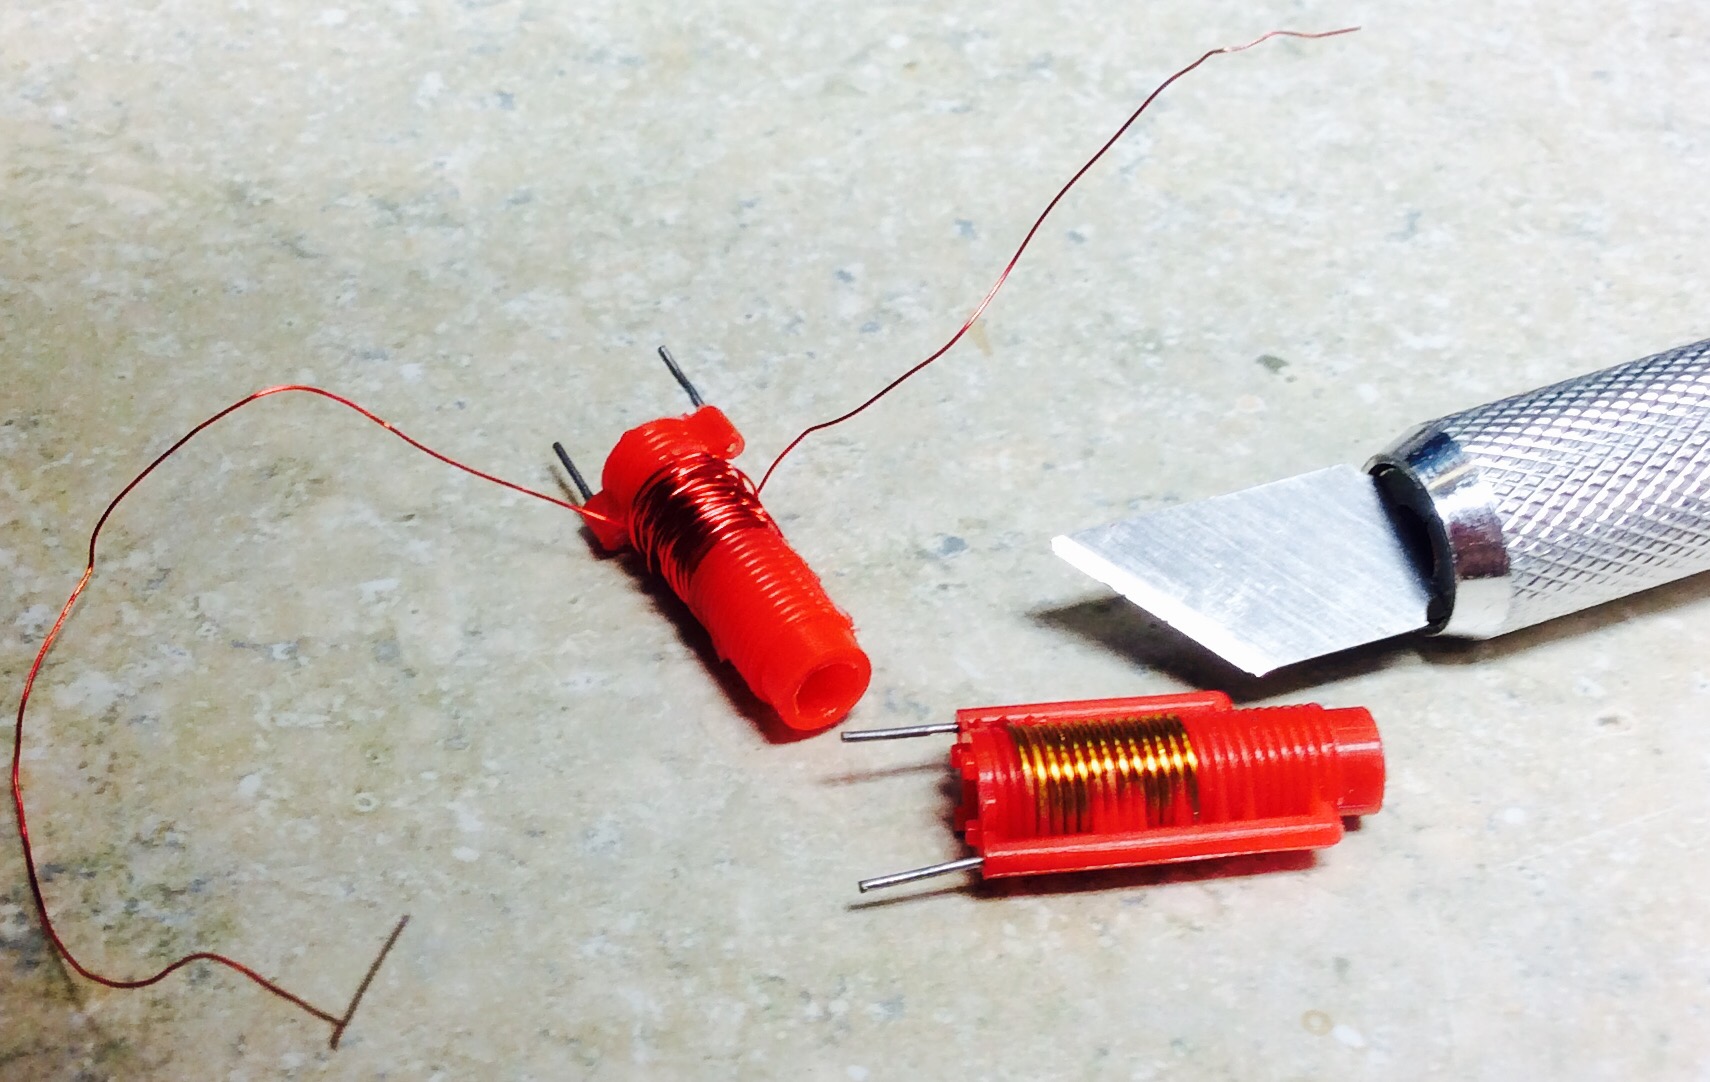
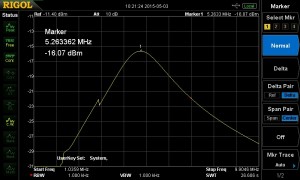
I’ve got the VFO section working. I substituted a VHF inductor that I rewound with 20 turns of 26AWG to get about 1.7uH. The MVAM108 can still be purchased easily from any store that sells NTE replacements. Look for NTE618. I found mine at Fry’s.


Turning vhf inductors into HF friendly coils

Many years ago I bought a bulk lot of these red slug tuned inductors off ebay. They present an inductance of less than one uH, so they were probably used somewhere in a VHF radio.

As an experiment, I cut off the windings, and wrapped my own 28 awg winding on it. I was hoping to create a variable inductor in the 3.7 uH range for an Epiphyte 2 radio that I’m collecting parts for.

I would about 30 turns on it, and tested the start to end inductance range while moving the slug. With 30 turns, I can get 3 uH to about 7 uH. The pigtails can be wrapped around the legs and soldered.

I tested the Q using a 100pf capacitor, and came up with a value of 205.


IMG_0539.JPG


red inductor serials LC spectrum analyzer screencap


Pushing to Pushbullet with Python

I’ve played with Pushbullet as a cheaper way to drive notifications of events from my household zwave system. For instance I’m pushing this service to push notifications of the front door bell to tablets and phones. Here is is some example Python code to get started pushing.


import os
import sys
import json
import httplib

kPushbulletUrl = "api.pushbullet.com"
kPushbulletPushUrl = "/v2/pushes"
kPushbulletUploadRequestUrl = "/v2/upload-request"
kPushbulletUploadUrl = "/v2/pushbullet-uploads"

def pushbullet(inTitle, inBody, inFile):
    headers = {"Authorization": "Bearer %s" % kPushbulletToken,
               "Content-Type": "application/json"}    

    #requestDict = {"type": "note", "title": inTitle, "body": inBody}

    strUrl = "http://<url>" % inFile
    requestDict = {"type": "link", "title": inTitle, "body": inBody, "url" : strUrl}

    body = json.dumps(requestDict)
    conn = httplib.HTTPSConnection(kPushbulletUrl)
    conn.request("POST", kPushbulletPushUrl, body, headers)
    response = conn.getresponse()
    if 200 == response.status:
        data = response.read()
        print(data)
    else:
        print("%s%s" % (response.status, response.reason))

    conn.close()

Smart night light turned into wall art

Luci, my middle daughter wanted a new nightlight because her store-special fairy one broke. We came up with the idea of a ballet night light.

I took some scrap acrylic from Tap Plastic’s remnants bin, cut them square on the table saw, then traced the silhouette of a ballerina on the opaque sheet. The opaque sheet sits on top of the transparent sheet. The acrylic is screwed on a small poplar frame. I put a white sheet of vellum on the inside of the acrylic to diffuse the light from the LED’s.

Several LED’s a soldered on a [very] crudely fashioned bus made of copper PCB. An Arduino Mini drives the LED’s on the PWM digital ports, and reads the ambient light. The night light only comes on when it is dark. Each LED is on a separate digital output. I wrote a simple flashy sequence into the unit when the unit comes on. Turns out Luci does not like the flashy lights. She just wants it to turn on at night and off during the day.


IMG_0536.JPG


IMG_0537.JPG


IMG_0538.JPG


Crypto Currency Mining on Raspberry Pi 2

I got my Raspberry Pi 2 a week ago from Amazon. I got tired of waiting for MCM/Element 14 to lower their ridiculous shipping costs.

The rpi2 is much snappier. I’ve never been a big fan of anything but the price point. I like the pcduino series for actual use.

I installed cpuminer (the trick is to install it from the GitHub download; do not clone the repo). The Rpi2 produces about 1.5 khashes/second. The chipset does get very warm to the touch. I’ve seen anecdotal comments that the original Pi could hash less than 0.5 khashes/second.


IMG_0523.JPG

3D printed brackets

I designed and printed these brackets to hold a Western Mountain Radio PWRbrite. This is a LED strip light that runs off 12VDC and uses PowerPole connectors. It may have come with with zip ties at one point, but those are now long gone.

This is part of my journey learning to use OpenSCAD.


mount(30, 40, 18, 5, 20);

module mount(width, height, hole, mount_width, flange)
{

difference() {
cube(size = [mount_width,height,width], center = true);

translate(v=[-3,6,0]) {
rotate ([0,90,0])
cylinder(r=hole/2, h=mount_width+2);
}
}

difference() {
translate(v=[0,-height/2,-15]) {
rotate ([0,0,90])
cube(size = [mount_width,flange,width]);
}

translate(v=[-2*flange/3, -width/2+1, 0]) {
rotate ([90,0,0])
cylinder(r=3, h=mount_width+2);
}
}
}

XYZ Printing DaVinci 1.0

A colleague at work bought a XYZ DaVinci 3D printer. I watched his break-in progress with great interest. This printer has a fantastic price point: $500 MSRP. I purchased mine on sale for USD$400. I’ve waited for the right time to purchase a 3D printer. I strongly believe this is a paradigm shifting technology, and my children need to be introduced to it. I’ve equated 3D printers as the “Mac moment.” In 1985, I remember when my Dad brought home a Macintosh. I remember him unboxing it, turning it on, then griping over the star screws that Apple used in the chassis. It forever changed my family. I think 3D printers are the same.

My first experiences with the XYZ are:

  • The extruder carriage was off by several steps on the belt. I had to push it back into alignment.
  • It appears the UHU glue sticks really are the best thing to use.
  • The unit needed calibration right off.
  • The units comes with a half-size filament cartridge. This lasts surprising long.
  • There is a lot of flex on the chassis. You can see overlapping metal walls lift off each other. This is easily remedied by a few extra rivets.
  • The ball bearing holders are bad of plastic. This will eventually decay and crack.
  • The XYZ software is incredible limited…but still adequate. I’m still running it.
  • After a month, the glass bed is already starting loose pieces of the glass when scraping off the product. These slivers are not large enough to affect the print quality, but this is the first piece that is going to need to be replaced. I’ve read on forums that XYZ will not warranty the glass bed.

IMG_0512

IMG_0514

quadrupod - Copy

IMG_0515 - Copy

Building a 40m ARRL Band-Pass Filter

Since I purchased the MiniVNA, I’ve been playing with Elsie and building band pass filters. A restricted version of Elsie is provided free of charge. The restricted version has more than enough power to do 99% of what an amateur radio home brewer could ask for. There is a pretty steep learning curve to doing a theoretical design with Elsie, then actually building it. Taking an putative design and matching it to capacitors that one has on hand and inductors that can actually be created (the winds fit on a given toroid).

As part of the learning process, I went back to one of the ARRL articles (linked at the bottom) that provided a table of values for each band. I breadboarded a 40m band pass filter, then used the MiniVNA to examine it’s phase and frequency characteristics. The final step was experimentally determining the output of the output RF impedance. This is done by placing a 50 Ohm Feed-Thru Coaxial Terminator between the scope probe and the scope. This uses the principle of a voltage divider given at least one known load value to calculate the impedance. Here is an article with online calculator for this topic. I calculated the built band pass filter at 53 ohms.

40m bandpass

(null)

Article Links:

This tree nearly destroyed the cabin

We arrived for a relaxing weekend to see this 50+ foot ponderosa came down inches from the cabin. It is feet from the propane tank, and inches from the house itself; missed the pump house by three feet. This time of year the ground should be fully frozen, but this is a very dry year. Compared to years past there was very little snow fall. The Friday night we arrived, it rained about an inch. The rain is welcome, but it is loosening the root structures of the trees at a time when there is much more wind. Since December at least five trees have come down.

(null)

(null)

(null)