Instrument for Measuring Absorbance 

I’ve been thinking about how to teach my kids quantifiable science.  I got a cheap science kit off Amazon for the kids a while back. The kit uses color changes to measure reactions using plant-based powders, but this is a binary outcome. It works or doesn’t. This is great for the first one or two experiments, but doesn’t really teach enduring principles, such as taking measurements, graphing, and ultimately forming to a conclusion.

The general idea behind measuring absorbance is to shine a light through a corvette (or test tube) and measure the amount of light that makes it through. Fancier instruments will use multiple wavelengths or an entire spectrum.

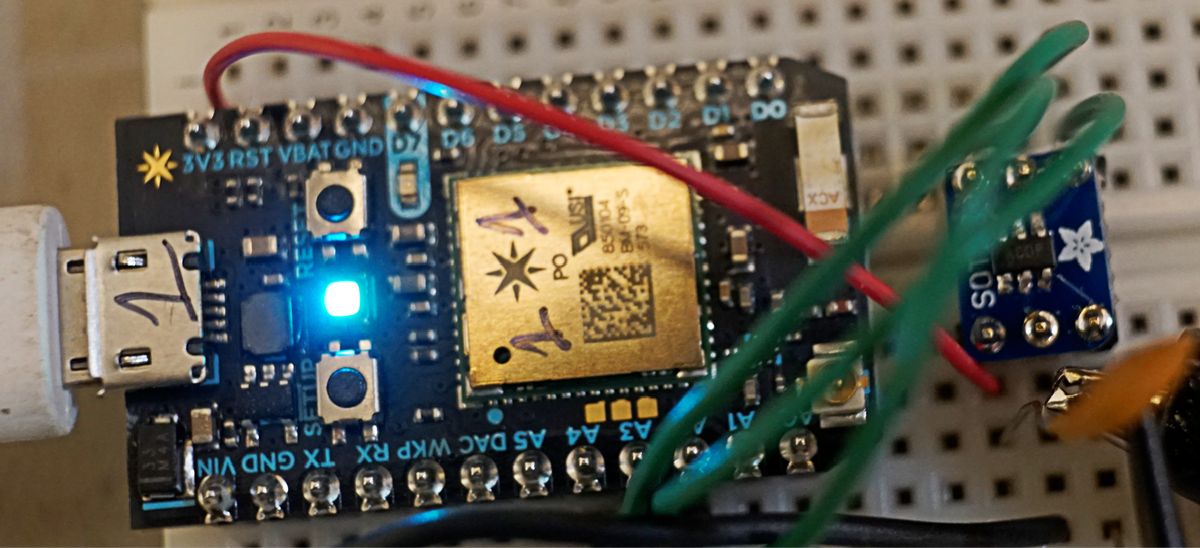
To keep this simple, I used a 3D printer to fabricate a holder for the test tubes from the science kit. A 635nm red LED shines in one side, and a BPW35 detects the light. The next step is to mount this on a small plastic project box with a cheap two line LCD display. A button (or two) will control taking measurements (and some kind of integrated calibration cycle).

This instrument will enable a simple number to be presented to the user. My kids can then perform reactions or dilute samples, and graph those numbers (math yeah).

absorbance instrument img_0880.jpg

MagicBox Automatic T/R Switch for QRP Radios

I’m ashamed to say that I’ve had this kit in the manila envelope since I purchased it three years ago. I’m finally at the point where I could really use the capability of switching in/out a transmitter. This is catalyzed by playing with the SDRplay and thinking about using it as half a transceiver.

The kit is straightforward thru-hole assembly. I’m thinking I will probably outsource the drilling of the front panel to a friend who has better accuracy than me 🙂

Crypto Currency Mining on the pcduino8 Uno

I recently picked up a pcduino8 Uno on Amazon for $40. The prices on the whole pcduino line has dropped a lot this past year due to stiff competition from Raspberry pi. This model is smaller than the pcduino3 line, does not have SATA, but does use the Allwinner H8.

For the record I don’t really believe in crypto currency mining. The ROI does not make sense unless you do this professionally and invest in high end ASIC hardware (and still have the guts to ride out major exchange rate fluctuations). However, cpuminer is an interesting metric to get relative performance data on wildly different hardware platforms and architectures.

The bottom line: cpuminer running on the pcduino8 uno cores (8 of them) produces about 1.6 to 1.7 khashes/second. The Raspberry pi 2 will do roughly 1.5 khashes/second on four cores.

On a side note, there does not yet appear to be a GPU driver for this board.


img_0878.jpg


Oak Hills WM-2 QRP Wattmeter

I decided to add a small water meter to my bench. The WM-2 caught my eye as it is made in the USA and boasts 5% accuracy. This little meter will from 5mw to 5 watts. It owns a gorgeous analog meter on its front. I wish my photography would do it justice; turns out its really hard to photograph analog meters because of the reflections and shadows.

The WM-2 comes as a kit. It’s just a handful of parts and can be assembled in a few hours.

WM2 side WM2 inside WM2 back WM2 front

High school robot

On a recent visit to my parents I sorted through a box of stuff left from high school. This little robot was in the box. It was a project I worked on at a high school robots club with Eric Prigge. See the 68HC811? That thing is a blast from the past.

Piggyback on the Arduino Yun utttpd

Installing a custom/dedicated web server on the Arduino Yun is a little tedious. Instead, one can reuse the already running uhttpd instance that is used for luci. uhttpd was written specifically for openwrt. Configuring it is pretty easy. The Yun image (and most of openwrt) configures uhttp by command line switches.

/usr/sbin/uhttpd -f -h /www -r Arduino -x /cgi-bin -t 60 -T 30 -A 1 -n 2 -p 0.0.0.0:80 -C /etc/uhttpd.crt -K /etc/uhttpd.key -s 0.0.0.0:443

The content directory is at /www and only scripts in /www/cgi-bin are allowed to execute. To test this, you can put a python script at /www/cgi-bin/test.py


#!/usr/bin/python

import cgi

print(“Content-type: text/html\n”);

print(“Hello World”);


Taking this a step farther:

The Yun has a bridge mechanism that allows the two processors to communicate. This is documented here. To hook up these two mechanisms, you need to download the tutorial sketch and put it on the Yun. The basic idea is that you can execute HTTP GET commands against a series of simple “Bridge” REST services that get and set the pins on the Arduino YUN.

What fun is a simple web page with some buttons when you can use Google Blockly? The Yun does not have much storage space. I had to install Blockly and other files on a micro SD card.   I prototyped just enough custom blocks to blink a light.  I only need two custom blocks: wait and writeDigital.

blockly digitalWrite


The process flow looks like this. Because the JavaScript code that each Blockly block runs locally, then can send AJAX requests back to the YUN’s web server. Each AJAX request can then use the YUN bridge to modify the GPIO.

arduino yun workflow


The actual Blockly program looks like this:

blockly for arduino yun


Epiphyte Build Update #2

I located a suitable (and cost effective) IF filter from China on ebay. It took me 3 months to take delivery of this part. The part was pulled from some existing piece of equipment. I’m substituting a murata CFJ455K  for the original IF filter. The only difference is the case is ~2mm longer. Unfortunately, this means it’s not pin compatible with the original drilled holes. The pcb has the space to drill new holes and drop the filter in.

I had not expected the IF filter to be easier to find than the CA3020A. I’ve made five purchases of this unit on Aliexpress, and not a single one of the sellers actually has one. If one is willing to pay $35 to $50, luck might be better. At this point, I”m thinking that a custom drop-in amplifier may be a better approach. A simplified push pull amplifier with a buffer will probably suffice as not all capabilities  of the CA3020A are used.

The receiver portion is mostly finished. The LO and VFO are aligned. The LO output is too high, it will need to be reduced by changing the value of C5.


epiphyte with murata filter

MAX11115 ADC with a Particle Photon

Maxim makes this small ADC that comes in SOT23 and other packages. The cost runs from $1.65 to a few dollars depending on if you choose 8, 10, or 12 bit variants. They boast sample rates up to 2 or 3 mega samples per second. These are 3V only chips. They are not 5V tolerant. This should make it easy to use with ARM or Raspberry PI boards.

I wanted to verify this work and get some proof of concept code. I chose to use the MAX11115AUT+T that I soldered onto an Adafruit SOT23 breakout board. The ADC can communicate use several digital protocols including SPI. It only takes three wires to control it: SCLK, MISO, and !CS.  When CS goes low, the SPI clock drives the digitizing of the signal. After one clock, the first bit is available on DOUT. An new bit is available each clock pulse. The ADC always writes two bytes out. If you are using the 8 bit ADC, you still need to read in the second byte.


MAX11115 ADC copy


MAX11115 timing


To test the sample rate, I wrote some code on the Particle Photon that reads in 100 samples, stores it in a buffer, then transmits it over TCP to a local python server. A signal generator is feeding the ADC a sine wave. Here is what the raw data looks like at various input rates. Please keep in mind this is a quick proof of concept. There is no buffering, impedance matching, or anti-aliasing. The SPI bus is running at Photon’s default clock speed.


MAX11115 1khz MAX11115 5khz MAX11115 20khzMAX11115 40khz


Failed SOTA attempt “The Twins” W7O/CM-013

My Friend Bruce and I decided to do a late fall camping trip at Waldo Lake in the Oregon Cascades. There are a several peaks that qualify for SOTA; “The Twins” W7O/CM-o13 was closest and had a trail to the summit. This peak is 7360′ in elevation. It has a smaller, false summit that is several hundred feet shorter.

We camped in the public campgrounds around Waldo Lake and left about 10am Monday morning. It snowed lightly the night before and was pretty cold. Temperatures were no higher than 32F at that time.


the twins real summitIt took us until about 1pm to reach the false summit. At that point there was 2-3 inches of snow on the ground. We lost the trail at this point and debated turning around.


the twins topo

We pushed ahead and bushwhacked our way around the rim, through the exposed snowfield leading up to the summit. At this point visibility dropped to a few hundred yards. There was 4-5 inches of snow on the summit.

We found a sheltered spot on the summit that shield us from the 20+ mph winds. Bruce and I assembled the Buddipole in a 20m vertical configuration. Bruce bravely volunteered to hold it. This was my first trip in the field with my KX3. I lugged a 10ah LiFePO4 battery along. I ran the KX3 at 10 watts power output. The noise on 20m was relatively low at S2-S3. We could hear a lot of stations, but had a hard time getting the signal out. We managed three contacts on 20m before the temperature started dropping.

About 1400 the temperatures got cold enough I lost dexterity in my hands we decided to pack it up and start out descent. We spent about an hour on the summit and saw at least an inch of snow accumulation. We took our time coming down and warmed up a bit. Overall this was a seven mile hike with about 1700 feet of elevation gain.

KL7HM AZ
AL4Y AK
W0RW Pike’s Peak, CO


the twins trail sign


bruce trail


small lake


bruce final ascent the twins


Josh summit the twins